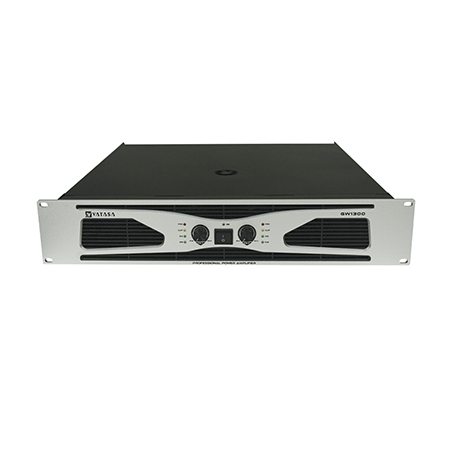
- Front panel:

1. Mains Power Switch When pressing the switch, the soft-start circuit runs for avoiding surge strike. In about 3-4 seconds, there will be a clicking denoting that the soft-start is finished. And more 1-2 seconds later, there will be another “clicking”, the amplifier is connected with the speaker and ready to work.
2. CH-1/CH-2 Input level control Adjust it to get the volume desired. Use CH-1 control only while the amplifier is set in Bridge or Parallel mode.
3. CH-1/CH-2 Protection indicating LED This red LED will light up when the amplifier is running unstable or went into thermal protection after the power elements temperature is over 90℃.
4. Clip LED Turns on just before the maximum, distortion-free, output level of the amplifier. The clip LEDs may turn on shortly from time to time but they may certainly not turn on for longer periods. In this case, you have to turn the output level down!
5. Signal LED The green signal led indicates that a music signal is present at this channel input.
6. Parallel mode indicating LED Indicate that the amplifier is working under the parallel mode, the indicator is lightened, input signal only acts on CH-1.
7. Bridge mode indicating LED Indicate the amplifier is working under BRIDGE mode, the indicator is lightened, and the input signal only acts on CH-1.
REAR PANEL:

1. CH-1/CH-2 input XLR standard XLR jack below is the connection method; Pin1: signal ground, Pin2: signal+, Pin3: signal-
2. CH-1/CH-2 Signal Link Output Standard XLR (male) socket for input signal link, its Pins parallel-connected with the female XLR socket so you can feed the same signal to another amplifier. Pin1: signal ground, Pin2: signal+, Pin3: signal-
3. INPUT SENSITIVITY SWITCH. With this switch, you can perfectly adapt the input sensitivity of the amplifier:26dB;1.4V;0.77V
4. CH-1/CH-2 35Hz HPF. The low cut filter cuts all undesired frequencies below 35Hz. protecting woofers against excessive swings.
5. Output Mode Set Switch. Select the run mode as STEREO or BRIDGE or PARALLEL
6. Resettable fuse When the amplifier malfunctions, the fuse will automatically disconnect the circuit loop; after the trouble is removed, the fuse will automatically reset, and resume working.
7. CH-1/CH-2 output SPEAKON Standard Speakon socket. 1+ 2+ :, 1- 2-: –
8. Binding post outputs These posts will accept bare wire cables that connect to your speakers.
9. Mains Power Supply Cord
-
MODEL GW800D GW800 GW1000 GW1300 GW1500 Output Power
(EIA 1KHz 1%THD)Stereo 8Ω 800W×4 800W×2 1000W×2 1300W×2 1600W×2 4Ω 1200W×4 1200W×2 1500W×2 2000W×2 2400W×2 Bridge 8Ω 2400W×2 2400W 3000W 4000W 4800W Output Connections Speakon Speakon & Binding Post Frequency Response 20Hz-20KHz ±0.5dB Input Sensitivity 0.775V 0.775V/1.4V/26dB Input Impedance 20kΩ/Balanced,10kΩ/un-Balanced S/N Ratio ≥102dB ≥100dB THD ≤0.02% ≤0.03% ≤0.05% Crosstalk @ Rated Output/8Ω/1kHz >65dB >70 dB Damping Factor/8Ω/1kHz >200 >240 Slew Rate 15V/uS Protection Soft Start, Short Circuit, Limiter, DC Fault, AC Line Fuse, Thermal Cut Cooling system Secondary cooling fan Two steps speed fan Mains Power supply AC:220~230V 50Hz Weight 19.6kg 23.5kg 25.2kg 26.5kg 27.5kg Dimensions (W×D×H) 482×494×88mm 482×464.5×88 mm





Đánh giá
Chưa có đánh giá nào.